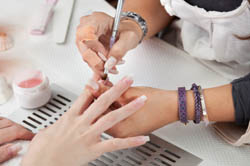
Gel nails extension is a complicated procedure, so it is better to be done by a specialist.
Let's look at what materials and equipment for gel artificial nails each manicurist has in the arsenal:
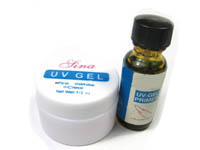
- Gel (can be as single phase, two phase, three phase, colorless, colorfull, with pastel colors and white for the French manicure ...)
- Primer - used to improve adhesion of the natural nail and gel (for gel nail extension). Externally, a bottle of primer is similar to a bottle of polish, but from the dark glass. Sometimes, it looks like a pen
- Brush for applying the gel (in the form of broad flat spatula, with straight-cut)
- Edge cuticle pusher
- Nail file 120/180 grit
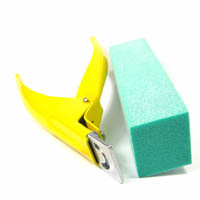
- Buffer
- Tip cutter
- Tips (from #1 to #10)
- Glue for fixing tips
- UV lamp (for drying gel)
- Cleaner for nails degreasing or 70% alcohol
- Liquid to remove artificial nails and glue
- Nail polish remover without acetone
- Top gel (finish gel) (protection against water)
- Paper napkins
- Cotton pads
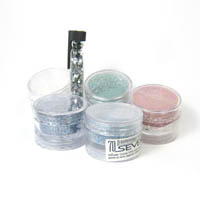
- Materials for design (glitter, sand, crystals, etc.)
 The first thing to do is cutting the nails, leaving them to the approximate length of two millimeters. Then gently remove the top layer of the polish with a soft nail file. It should be done to remove such irregularities as the longitudinal and transverse strips in order to keep tips tightly. After the files, we use a buffer to polish nails, which ultimately make their surface smooth. That's it - the nails are prepared for the extension.
The next step is degreasing nails by specifically designed for this fluid or 70% alcohol. Do not touch the nails after degreasing. Further tips are matched by size of the nails and glued with special glue.
When gluing tips the important point is that you have to avoid air bubbles under them, otherwise they will quickly fall off.
After all the tips glued, it is time to give them the desired length and shape. To do this, the master cut them with a special device - tips cutter, afterword gives them the desired shape using nail files. Then he polishes surface of the artificial nails with nail files and buffer until the border between tips and natural nails becomes invisible.
The next phase of the extension - degreasing of the entire surface of natural and artificial nails and application of primer to the area of natural nails. It is important to note that the primer is applied on the completely dry nails, and in any case it should not get on the skin and the artificial nail.
After applying the primer the process of applying the gel begins. But if it is a French manicure, firstly the specialist applies white gel on the nails, forms a "smile" and asks the client to dry the nails with white gel under UV lamp. Then forming a pile on the stress area, master equally distributes the gel making a thin layer (How to form a stress zone).
Tip: if you want to have the gel without bubbles when applied to the nails, you need to grab it from the edge of the jar with the gel, and not from the center, moreover, it should be done gently - without whisking gel. You also need to pay attention to the brush for the gel, it should not be fibered, otherwise it will form air bubbles when applying the gel or after drying. After the work you have to clear the brush from the gel but it should be done very carefully - not fluffed up a brush. It is best to just soak the brush for 0.5 - 1 minute in the liquid which you usually use to clear - it may be rubbing alcohol, formic alcohol, liquid to remove an adhesive layer, and then get wet by the napkin. Keep the brush in a way its hairs touch nothing. While working the gel and other chemical materials should not be near the UV lamp.
 When the work is completed, you need dry all this. As long as you dry the one hand, the master applies gel on the nails of the other hand then you dry as well. If the master is using single-phase gel (which is much easier) and if the art design is not expected this time then the work with the gel is completed.
However, if the design will be created, e.g. design with sequins, after the primer a thin layer of the gel should be applied and sprinkled by glitter on it (on the free edge of the nail). Next stretch them with brush uniformly to the cuticle or form a zone of the smile (instead of the white gel). Then you need to dry the layer of gel with glitter, and then apply another layer of the gel to form a mound in the stress zone and again dry it under UV lamp.
Further, extented nails must be degreased and carefully polish the top layer of artificial nails with nail files, while removing all the roughness if any, as well the free edge of the nail should be made smooth and with no clues. After polishing with files do the same with buffers and rins nails in the end. Smooth and shiny nails thicken and become ugly after processing with files and buggers, but you should not worry about it! A few minutes later, when the nails are completely dry, the master apllys finish covering, which must also be dried in the UV lamp. Finish - Gel will give gloss to the nails and protect them from exposure of water. If there is no design, you can paint your nails with lak, but do not forget that it can only be removed with liquid, which does not contain acetone!
Now you are the owner of a beautiful artificial nails! How can you care for the nails? This can be found here Nail Care!


